I have installed a custom ROM called euROM on a Xiaomi Redmi 9T and rooted it too (my private photo album regarding Redmi 9T). I am going to send this device to a friend in the US for partially selfish reasons (shared album compiled specifically for this friend). Actually, I have also rooted a Redmi Note 10 Pro (private photo album for Redmi Note 10 Pro) at the same time, which I am going to use myself, but I am going to write about the whole process in a separate article.
Preliminary Research
I referenced many resources, but particularly the following.
- “Redmi 9T カテゴリーの記事一覧 – ミ田ろぐ“
- “Redmi 9T 日本版 各種カスタムROMインストール方法(注意点アリ) – ミ田ろぐ“
- “【Xiaomi】Xiaomi系スマートフォンのブートローダーアンロック方法【Redmi/POCO】 – ミ田ろぐ“
- “Xiaomi端末のROM焼きの用語集 – ミ田ろぐ“
- “【ROM焼き専用】【Xiaomi】Redmi 9T“
- “【ROM焼き専用】【Xiaomi】Redmi 9T Part2“
Special care was taken in making sure that my friend will be able to use it by herself, including applying a system update when there is one. This is not a big deal with someone who is physically close-by, but this was a major sticking point in this case.
Unlocking Bootloader and Choice of Custom Recovery Tool
I do not know for sure whether you can get OTA updates after you unlock the bootloader or not. Some say you can; others say you cannot. It possibly depends on the manufacturer, or even on the specific model. “【Xiaomi】Xiaomi系スマートフォンのブートローダーアンロック方法【Redmi/POCO】 – ミ田ろぐ” says you can as long as you stick with the stock firmware or “ROM”.
“Can I still get system updates from Xiaomi even after rooting? – Quora” (snapshot)
Yes you will continue getting OTA updates in rooted phone and you will be able to download them too. But you would only be able to install those updates if you have a stock recovery and thus haven’t flashed a custom recovery(which is likely the case in rooted phones).
Also it is recommended to not modify system partition like by using xposed framework and to perform systemless root using magisk(as rooting through SuperSU modifies system partition).
If you have flashed a custom recovery then if you tap reboot after an OTA download then you will end with a custom recovery opened(where the OS assumes the stock recovery to be) and thus the OTA won’t be installed as unlike the stock recovery the custom recovery doesn’t know what to do further with the downloaded updates.
Note 1: Stock recovery(the one which comes with the phone) is needed to install OTA updates, so backup the stock recovery before flashing a custom recovery, download stock recovery img from your smartphone company’s website(if it provides stock recovery) or extract it directly from the recovery rom or fastboot rom.
Note 2: Don’t install OTA updates manually using a custom recovery(until there is a flashable updated rom is created by developers specifically for custom recoveries) as the update is specifically made for stock recovery and thus it may lead to a corrupted OS or even more severe results in some cases. It may or may not work.
Always do lots of research before doing anything. It may be somewhat irritating but it can save you from some real big problems(personal experience).
However, a custom recovery called OrangeFox Recovery seems to make it possible. I found this info on a Xiomi-hosted BBS. Sure enough, OrangeFox offers this guide: “MIUI / Flyme OTA | OrangeFox Recovery wiki.” “TWRP vs Orange Fox Recovery: Which is the Best Recovery?” says OrangeFox’s support for MIUI OTA is one of its advantages over TWRP. It also has built-in support for Magisk. “Redmi Note 10 Pro【その11】euROMのアップデート : 機械道楽 弐番館” demonstrates how you can upgrade a custom ROM by moving the update file from the internal storage to the external one so it can be seen by OrangeFox Recovery.
OrangeFox Recovery for Redmi 9T (lime/juice)
Redmi 9T is not officially supported by OrangeFox, but there’s an unofficial build for it (learned this from “Xiaomi Redmi 9T ROM焼き カスタムROM (GSI) 焼いてみた – スマホ・タブレット“). Its latest version is : R11.1 (23 July 2021) and it seems to cover MIUI 12.x. “Redmi 9T 日本版 各種カスタムROMインストール方法(注意点アリ) – ミ田ろぐ” shows you how to install and use this unofficial build. I used juice/OrangeFox-R11.1-Stable-Unofficial-juice.zip/.
By the way, that unofficial build of OrangeFox Recovery talks about “juice,” but I could not find it in the list of known codenames. Turns out it is a joke, which is meant to mean “lime” (Redmi 9T/Redmi 9 Power/Redmi Note 9 4G) and “citrus” (POCO M3) combined.
Choice of Custom ROM

MIUI is Xiaomi’s variant of Android, and it comes in three flavors: Chinese, global, and EU (Xiaomi.eu). My Redmi 9T and Redmi Note 10 Pro come with the respective global version. However, even the global version shows ads and it is annoying. Once a custom recovery like OrangeFox Recovery is installed, you can install other flavors, and other so-called custom ROMs.
Xiaomi.eu MIUI ROM is very unique. It is developed by Xiaomi Europe (or commonly “Xiaomi.eu”), which is not a part of Xiaomi. It closely follows the Chinese MIUI, the one the most actively developed by the Xiaomi proper, yet it removes the Chinese MIUI’s annoying features (e.g., ads) and adds many useful features. What is interesting is that Xiaomi.eu officially works with Xiaomi, which effectively gives Xiaomi.eu MIUI ROM a semi-official status.
PixelExperience is another custom ROM, which mimics Google’s Pixel. It does not support Redmi 9T (lime, or more broadly, juice) but supports Xiaomi Redmi Note 10 Pro (sweet) (Android 11).
Generic System Images is a product of Google’s attempt to separate the lower-level stuff from the Android itself (Project Treble), with the expected result of the newer Android being rolled out quicker. The obvious downside is that device-specific tuning is entirely absent in GSIs. According to “Xiaomi Redmi 9T に Android 12 の GSI を焼いてみた感想 – スマホ・タブレット,” current Android 12 GSIs for Redmi 9T seem all too unstable for daily use. But that is not our concern. We have a wealth of custom ROMs specifically made for Redmi 9T.
Xiaomi.eu MIUI ROM (or sometimes just “euROM” for brevity) is as official as it can get without the Chinese nonsense, so I chose this to install on the Redmi 9T.
Actual Execution of the Plan
Directories on the MicroSD Card
I inserted a 128GB microSD card into the handset, which I am going to leave there when I send the Redmi 9T to my friend. Be able to use an external storage helped a lot in this whole tweaking process. I created the following directories at the root directory of the card so she and I can easily tell what they are for:
- _ROMs directory, where all the zip files to flash are stored. Basically these are the files she should not even touch.
- Inside there is a _ROOTING directory, where files related rooting are stored.
- _APKs directory, where general app installation files (APK files) are stored. In case she or I have to re-install a ROM, we can install additional apps from here. But usually she’d want to restore from backup files below.
- _BACKUPs directory, where backup files are kept.
- _TITANIUM subdirectory
- FOX (no preceding underscore) directory, where OrangeFox Recovery stores the backup files it creates
Unlocking Bootloader
Basically I just followed the instructions in “【Xiaomi】Xiaomi系スマートフォンのブートローダーアンロック方法【Redmi/POCO】 – ミ田ろぐ.” Maybe the hardest part was to wait for the mandatory one week wait period to pass after you submitted the unlocking request to Xiaomi. There really is not much you can do in this period. Whatever you do to the device is wiped clean when you actually get to unlock the bootloader.

Installing OrangeFox Recovery
Again, I just followed “Redmi 9T 日本版 各種カスタムROMインストール方法(注意点アリ) – ミ田ろぐ.“
euROM for Redmi 9T (lime/juice) and Rooting
Again, I followed the same article. I chose MIUIv12/xiaomi.eu_multi_HMNote94G_HM9T_V12.5.4.0.RJQCNXM_v12-11.zip, released on November 9th, which is the latest stable release as of this writing. It is based on Android 11.
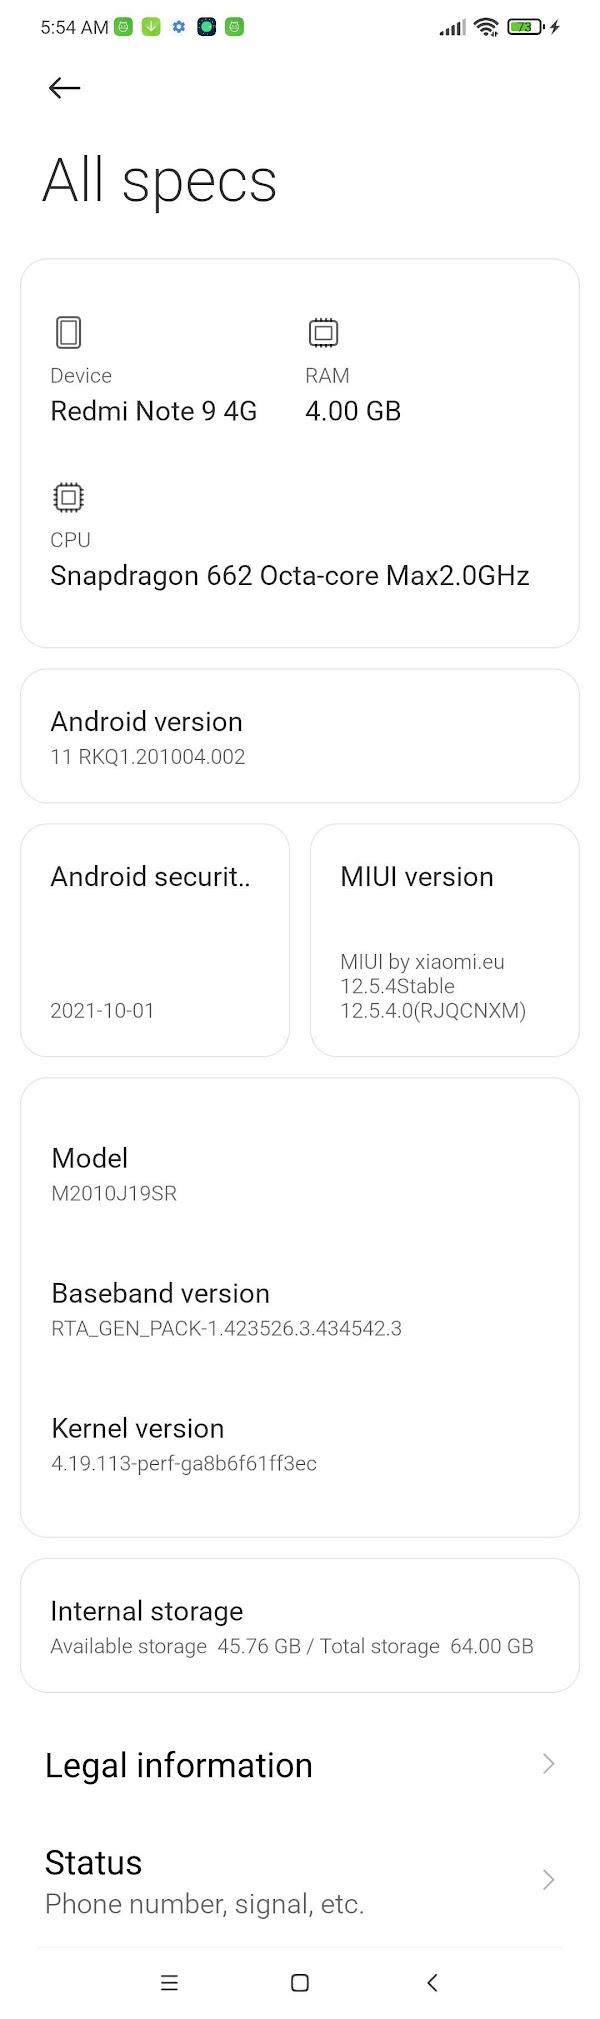
After installation, the device identifies itself as Redmi Note 9 4G, but it is expected. It does come with Google Play Store, but other Google apps (e.g., Chrome, Gmail, Google Photos, etc.) are missing. This is not a problem — You can just install what you want from Play Store.
Magisk for systemless rooting was supposed to be covered by OrangeFox Recovery, but it wasn’t as far as I could tell, possibly because what I am using is an unofficial one. But then again, flashing Magisk from recovery is no longer the recommended installation method anyway. I downloaded Magisk v23.0 and followed the official installation procedure. From PC, adb reboot bootloader gets you into the fastboot mode. When the device is in fastboot mode, you can fastboot reboot to reboot it.
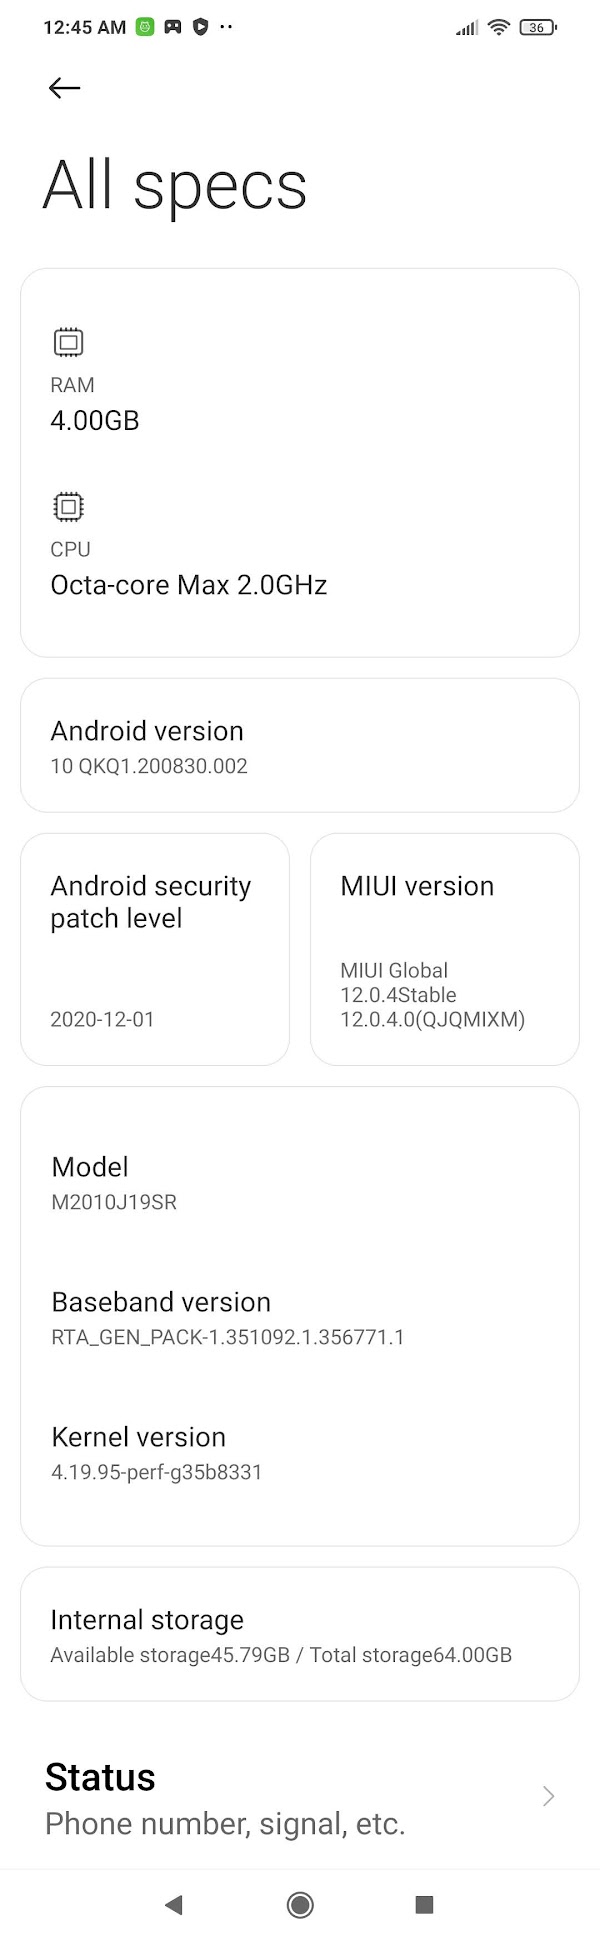
Comparison of Phone Specs Before and After